In this week’s installment of our series on how to start the social media platform of your choice, we’ll be breaking down everything you need to know about Instagram.
The Basics
As we covered in our post on how to start a Twitter, Twitter is a mainly text-based platform. For Instagram, think the opposite: it’s all about the image! An Instagram post consists of an image or video in which you can tag other accounts (don’t worry, we’ll get to that later) and add a short caption, to which tags and hashtags can also be added.
The Content
Instagram is perfect for visual-based information and research. Eye-catching images, colorful graphics, and high-quality videos (warning: can only be 1 minute or shorter) are sure to do well on this platform; feeds with these types of posts are very likely to gain traction. On the other hand, this is not the platform for posts with excessive text, blurry or low-quality photos, or irrelevant graphics. If the majority of what you want to share is text-based, consider taking a look at how to start one of the other numerous social media platforms.
Instagram also has a feature known as “Stories” which appear at the top of your feed (again, don’t worry--we’ll break this all down soon!). An Instagram Story is a photo or a video that will appear for only 24 hours, unless saved to something called a “Highlights” reel. It is separate from your feed and is a great way to share time-sensitive information, like details for an event going on that day or something of that nature.
Always remember, if you’re creating any form of social media for University use (think a program, club, event, or anything associated with the UConn brand in any way), make sure to check with the University Brand Standards here before officially creating an account.
Logistics
Now that we know the basics of the app, how do we actually make a successful account? Just follow these easy steps.
Step 1
One of the unique things about Instagram is that it’s only accessible on a phone or tablet device. You can’t make an account on your desktop computer: therefore, you must download the app onto your mobile device in order to begin. From there, just follow the prompters to create the account.
Step 2
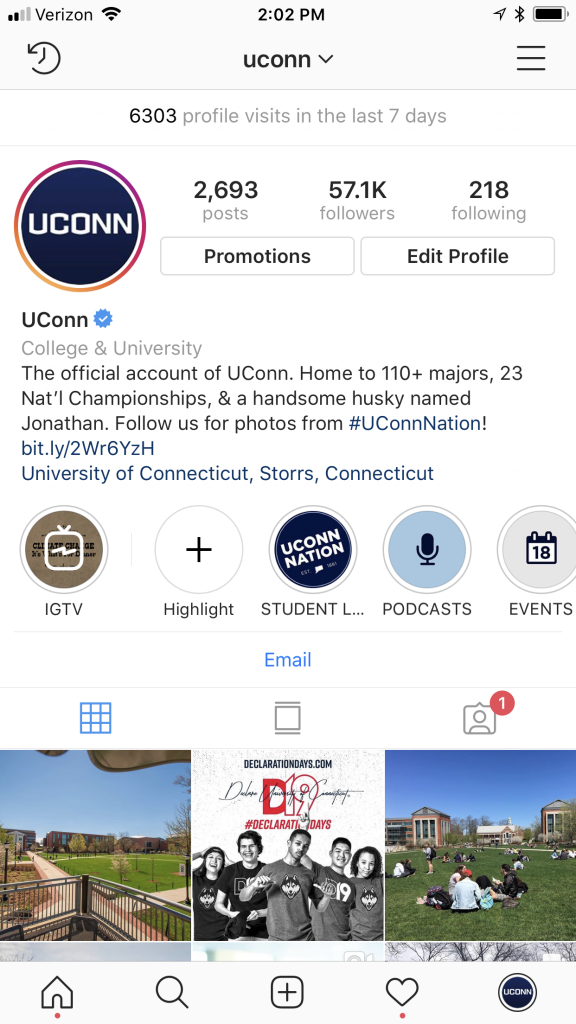
Like all forms of social media, choosing a relevant username is incredibly important. Your username is how people will search you, so make sure that the key words pertaining to your name, program, organization, club, research, or company are in your username. The same goes for bios--make sure to put all information pertinent to you/your brand in a quick blurb that’s easy to read and understand. In addition to a bio, you can put a relevant link and location. You (and others that view your account) will be able to see the number of followers and those you’re following on the account.

Your profile will look something like this. In addition to all the features mentioned above, you’ll be able to see all of the posts you’ve created.
Step 3
Once you’ve created your account, it’s time to follow other relevant accounts. Once you’ve connected with these new accounts, your feed will look something like this:

Your feed will show other people’s posts, the number of likes that posted has gotten, and the timestamp on that post. At the top of the feed are where Instagram Stories come in. See those circles up top? If you click on any of those, the account’s Story will automatically begin playing. Remember: your Story isn’t connected to your actual feed of photos/videos in any way and only lasts for 24 hours. The only way to make them remain for longer than 24 hours is to pin the Stories as “Highlights,” in which they’ll live at the bottom of your bio (refer to Step 2’s photo for reference). You can divide these Highlights into categories, as we’ve done, or you can keep one big Highlights reel.
*PRO TIP: Being active on Instagram Stories is a quick and easy way to build a following and interact with your followers. On Stories, there are options to post polls and questions which your followers can directly respond to. By keeping up this virtual relationship, other accounts will be more likely to interact with your account and you will expand your following while also building up content--a two in one! Saving your Stories and dividing them into labeled Highlights is another way to set your account apart from the rest and show even more content without being too overwhelming.
Step 4
Notice the icons on the bottom of the example screen in Step 3? The house icon on the far left represents your feed, where you can see all of the posts from accounts that you follow. The search icon allows you to search accounts, tags, and places. The plus icon in the middle is what you press when you’re ready to post a new photo or video (remember, to your Instagram feed, NOT your Stories). The heart icon represents alerts: whenever someone mentions your account in a comment, likes one of your account’s photos, or begins to follow your account, you’ll get a notification here. The final icon is your account’s profile picture, symbolizing that that’s where you view your own profile.
*PRO TIP: What’s a tag? A hashtag is a simple way to group similar photos together. For example, if you hashtagged #apple, you would be able to see all other posts that were also hashtagged #apple. Hashtags are a great way to find other accounts with similar goals and tendencies to your own, especially since you can search by tags, as mentioned. Hashtags on Instagram are a great tool to utilize and shouldn’t be overlooked!
Step 5
Time to start posting! Make sure to post things that are relevant to your brand. It’s also always important to think about your content from your audience’s perspective: what do they want to see? It’s also important to stay consistent with your Instagram posts. Try to post at least once every 1-2 days to stay relevant, build up a following, and establish an aesthetic for your social media page.
Step 6
But wait: there’s more! What if you want to post an Instagram Story? In order to do this, press the home icon that takes you to your feed. Then, swipe left on your feed. You’ll get to a screen that looks something like this:

Press the white button to take a photo or video to post in the moment, or if you would prefer to use a photo or video you’ve already taken, press the square to the far left to search your camera roll.
Step 7
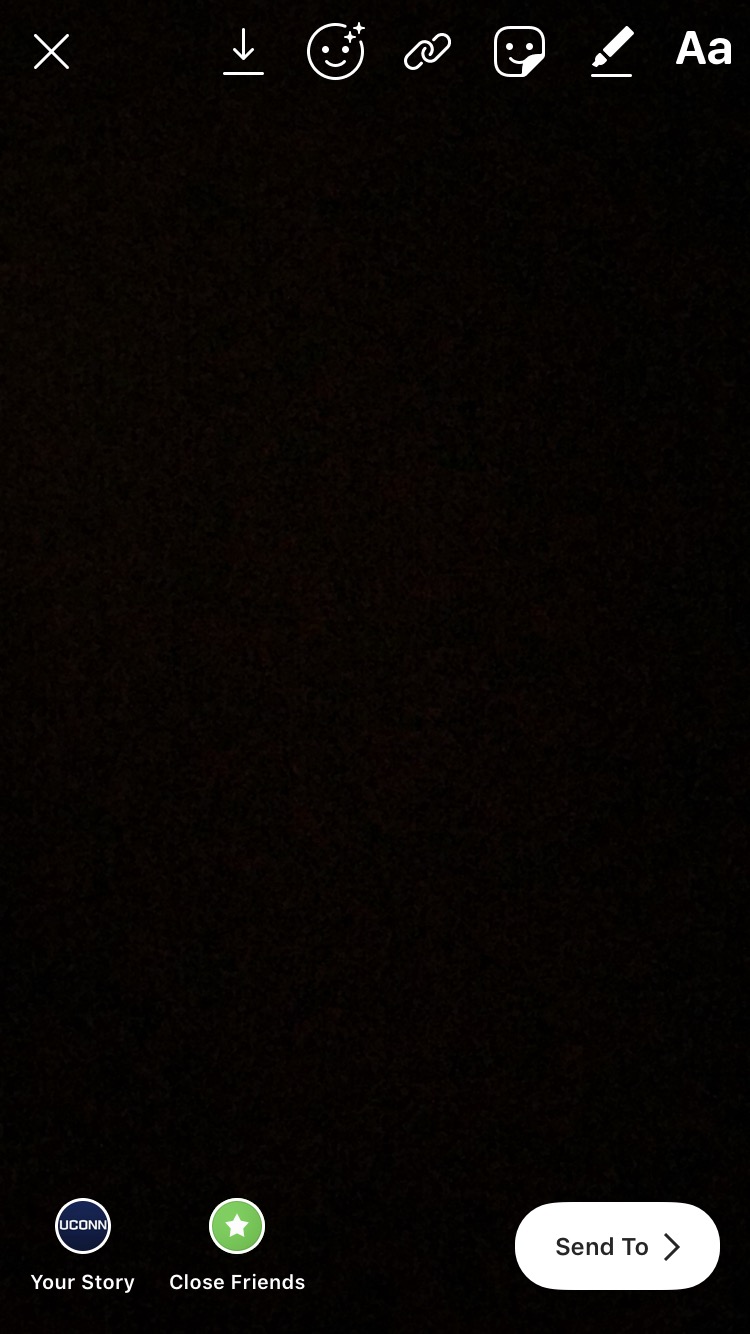
Once you take or select the photo or video you want to post to your Story, your screen will look something like this (imagine the black screen is the photo being posted):

The icons on the top provide options for enhancing your photo. For example, the “Aa” icon allows you to add text, which the pen icon allows you to draw directly on your photo, and the smiling square icon allows you to add features like polls, questions, and GIFs (moving images) as discussed above. Once your masterpiece is finished, click the Send To button and choose Your Story and voila! It’s been posted.
Here are the main takeaways to keep in mind when deciding to create an Instagram account:
- Instagram is highly visual-based, so make sure to have some eye-catching content!
- Use hashtags to connect with similar accounts.
- In addition to your feed, Instagram Stories is a great way to stay active without overwhelming your followers.
With these tips and instructions in mind, you’re ready to create the perfect Instagram for your event, company, or organization of choice!
